ShopDreamUp AI ArtDreamUp

Deviation Actions
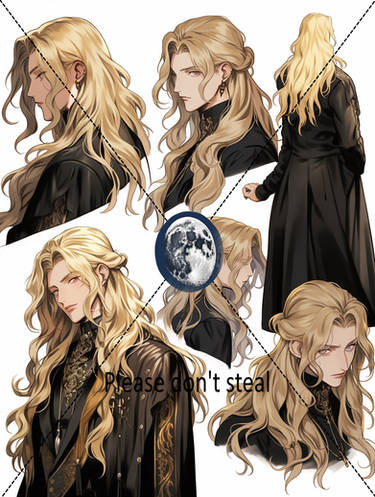


![[AUCTION / CLOSED] choose COLOR and CLOTHES #2](https://images-wixmp-ed30a86b8c4ca887773594c2.wixmp.com/f/1c70fa36-f585-416b-880c-73fe87f4d472/dalbulf-50d375b0-17ec-4b12-b1b2-67d250c5adba.png/v1/crop/w_184,h_184,x_0,y_19,scl_0.074193548387097,q_70,strp/_auction___closed__choose_color_and_clothes__2_by_mergo_artworks_dalbulf-92s-2x.jpg?token=eyJ0eXAiOiJKV1QiLCJhbGciOiJIUzI1NiJ9.eyJzdWIiOiJ1cm46YXBwOjdlMGQxODg5ODIyNjQzNzNhNWYwZDQxNWVhMGQyNmUwIiwiaXNzIjoidXJuOmFwcDo3ZTBkMTg4OTgyMjY0MzczYTVmMGQ0MTVlYTBkMjZlMCIsIm9iaiI6W1t7InBhdGgiOiJcL2ZcLzFjNzBmYTM2LWY1ODUtNDE2Yi04ODBjLTczZmU4N2Y0ZDQ3MlwvZGFsYnVsZi01MGQzNzViMC0xN2VjLTRiMTItYjFiMi02N2QyNTBjNWFkYmEucG5nIiwiaGVpZ2h0IjoiPD0xNDQ5Iiwid2lkdGgiOiI8PTEwMjQifV1dLCJhdWQiOlsidXJuOnNlcnZpY2U6aW1hZ2Uud2F0ZXJtYXJrIl0sIndtayI6eyJwYXRoIjoiXC93bVwvMWM3MGZhMzYtZjU4NS00MTZiLTg4MGMtNzNmZTg3ZjRkNDcyXC9tZXJnby1hcnR3b3Jrcy00LnBuZyIsIm9wYWNpdHkiOjk1LCJwcm9wb3J0aW9ucyI6MC40NSwiZ3Jhdml0eSI6ImNlbnRlciJ9fQ.B2uD1safAQEDKDi_k66JfCeTXSwt1T5VedTIm2XubrU)
![[AUCTION / CLOSED] choose COLOR and CLOTHES #2](https://images-wixmp-ed30a86b8c4ca887773594c2.wixmp.com/f/1c70fa36-f585-416b-880c-73fe87f4d472/dalbulf-50d375b0-17ec-4b12-b1b2-67d250c5adba.png/v1/crop/w_92,h_92,x_0,y_10,scl_0.037096774193548,q_70,strp/_auction___closed__choose_color_and_clothes__2_by_mergo_artworks_dalbulf-92s.jpg?token=eyJ0eXAiOiJKV1QiLCJhbGciOiJIUzI1NiJ9.eyJzdWIiOiJ1cm46YXBwOjdlMGQxODg5ODIyNjQzNzNhNWYwZDQxNWVhMGQyNmUwIiwiaXNzIjoidXJuOmFwcDo3ZTBkMTg4OTgyMjY0MzczYTVmMGQ0MTVlYTBkMjZlMCIsIm9iaiI6W1t7InBhdGgiOiJcL2ZcLzFjNzBmYTM2LWY1ODUtNDE2Yi04ODBjLTczZmU4N2Y0ZDQ3MlwvZGFsYnVsZi01MGQzNzViMC0xN2VjLTRiMTItYjFiMi02N2QyNTBjNWFkYmEucG5nIiwiaGVpZ2h0IjoiPD0xNDQ5Iiwid2lkdGgiOiI8PTEwMjQifV1dLCJhdWQiOlsidXJuOnNlcnZpY2U6aW1hZ2Uud2F0ZXJtYXJrIl0sIndtayI6eyJwYXRoIjoiXC93bVwvMWM3MGZhMzYtZjU4NS00MTZiLTg4MGMtNzNmZTg3ZjRkNDcyXC9tZXJnby1hcnR3b3Jrcy00LnBuZyIsIm9wYWNpdHkiOjk1LCJwcm9wb3J0aW9ucyI6MC40NSwiZ3Jhdml0eSI6ImNlbnRlciJ9fQ.B2uD1safAQEDKDi_k66JfCeTXSwt1T5VedTIm2XubrU)


Description
Warning – Huge File!
Please fullview or hit the download button to see everything.A walkthrough of this piece:

After my lineart walkthrough

I´ve decided to do a colouring walkthrough. So it came in quite handy that my friend
 *Darya87 asked me to colour one of her linearts.
This is the technique I use for my fanarts.
Note that when I do cell shading, I do usually not use the method in which you set your layer to overlay and paint then, like =noblestallion does it, for example - except I do have a patterned space to shade (stripes, flower pattern, tartan, etc.).
1. I start by filling the base layer under the lineart with a colour that contrasts with most of the colours I will use. This helps me see whether I paint still within the lines. Then I create a new layer and kind of block in the base skin colour. I always start with the skin, and I´m always quite messy with it.
2. Now it gets freaky. I create a third layer, and with a contrasting colour I paint the “cells”, the shadowy areas, with a default hard brush. Depending on which colour I use it ends up looking really weird.
3. Then I lock both the shadow layer AND the base skin colour layer. I pick the colour I want to give the shadowy parts and paint everything that was blue i here in that colour. Then I choose a soft airbrush brush and, with a colour that´s slightly darker than the one on the layer I want to paint on, I add some slight gradient on the parts that are supposed to be darker. This way, I create this effect of a multi-coloured skin. After that, I merge the two skin layers to one, create a new one on top of it and add a few highlights with a lighter colour. I merge them again and carefully erase what´s too much.
4. I create the next layer under the completed skin layer. That way, I won´t need to erase that much afterwards.
5.– 7. You see that I use the same technique for the clothes as for the skin. I even use it for the hair! XD
8. Added the tattoo, the pants and the rapier. The tattoo was painted over the skin layer, on a new layer set to overlay. The sword has been coloured with a hard brush and shaded with both a hard brush and one set to airbrush.
9. Added the hair and the eyes. The highlights in the hair have been painted with a small brush set to airbrush. The layer has then been duplicated and the Gaussian blur used on the lower one. You have to experiment yourself with the value to see what you like best.
10. Added a background. Round brush set to scatter, diagonal stripes and LOADS of motion blur and Gaussian blur. XD
11. Adjusted the colours. At that stage, all the layers EXCEPT the background and the lineart are merged together. I adjust my colours the old fashioned way: here I duplicated Jean, took his lower version and adjusted his colours by adding more yellow and red, which again looked quite freaky. Then I took my eraser, set it to airbrush (or any other soft round brush) and set opacity between 20% and 50%, but never more than 50. Then I carefully some parts of the layer I did not change the colour, so that the colour from underneath shines through.
Also, I changed the background a bit.
12. Finishing touches. I add a few sparkles, a bit of white, and put a few highlights on the lineart itself. Et voilà!
I hope this explains a bit how I work, and maybe it can be somehow beneficial for you. :3
Lineart
 [link] (N° 8) by *Darya87
Jean (character, design & lines) © *Darya87
Colouring © *SweetLittleVampire (me)
Image size
2637x4961px 9.17 MB
© 2013 - 2024 SweetLittleVampire
Comments13
Join the community to add your comment. Already a deviant? Log In
Ich liebe es <3